Pokémon Tower: Difference between revisions
m Added mention of Hypnosis tutor |
m Text replacement - " Poke" to " Poké" |
||
| (10 intermediate revisions by 5 users not shown) | |||
| Line 5: | Line 5: | ||
It is a numerously multistory building, housing dozens of floors: 7 upper-level floors, 29 basement floors, and a [[Membership|membership]]-exclusive bottommost floor. | It is a numerously multistory building, housing dozens of floors: 7 upper-level floors, 29 basement floors, and a [[Membership|membership]]-exclusive bottommost floor. | ||
This tower serves as an essential lead-up for a trainer's [[Gym | This tower serves as an essential lead-up for a trainer's [[Gyms|Gym-successional storyline]], as it is the central premise of the [[Pokéflute (quest)|Pokéflute quest]] wherein the eponymous item is obtained to rouse the otherwise-soporific [[Snorlax]] on [[Route 12]]. | ||
It is putatively the most viable area to hunt for [[Ghost_(type)|Ghost]]-type Pokémon. Many of the Ghost-type inhabitants are believed to be the ghostly manifestations of deceased Pokémon, including a ghostly [[Marowak]] mother on the sixth floor that must be defeated in order to be properly exorcised. | It is putatively the most viable area to hunt for [[Ghost_(type)|Ghost]]-type Pokémon. Many of the Ghost-type inhabitants are believed to be the ghostly manifestations of deceased Pokémon, including a ghostly [[Marowak]] mother on the sixth floor that must be defeated in order to be properly exorcised. | ||
| Line 16: | Line 16: | ||
===[[Hypnosis]]-tutor=== | ===[[Hypnosis]]-tutor=== | ||
A [[Move tutors|move-tutor]] for the [[Hypnosis]] technique can also be found in | A [[Move tutors|move-tutor]] for the [[Hypnosis]] technique can also be found in Pokémon Tower B12. She will teach [[Hypnosis]] to any compatible pokemon for a price of {{Pdollar}}12,000 per tutee. | ||
===Basement floor=== | ===Basement floor=== | ||
Subjoined to the tower is a complex of basement floors; there are 30 of them total: a sinuous concatenation of 29 basement floors and the bottommost Pokémon Tower | Subjoined to the tower is a complex of basement floors; there are 30 of them total: a sinuous concatenation of 29 basement floors and the bottommost Pokémon Tower Underground map, which can be accessed exclusively by [[Membership|members]] for a trove of [[List of Pokémon by Rarity Tier|rarer]] [[Ghost_(type)|Ghost]]-type Pokémon. | ||
Because of the intricacy of the maze, it is easy to become misdirected when navigating your way to the bottommost basement floor; as such, it is advised to overview the collage below as a navigational aid, which annotates all the floors that all ladders and telepads are interlinked to. | Because of the intricacy of the maze, it is easy to become misdirected when navigating your way to the bottommost basement floor; as such, it is advised to overview the collage below as a navigational aid, which annotates all the floors that all ladders and telepads are interlinked to. | ||
| Line 58: | Line 58: | ||
==Wild Pokémon== | ==Wild Pokémon== | ||
===2F=== | ===2F=== | ||
{{AreaLandSpawns|Location= | {{AreaLandSpawns|Location=Pokemon Tower 2F}} | ||
===3F=== | ===3F=== | ||
{{AreaLandSpawns|Location= | {{AreaLandSpawns|Location=Pokemon Tower 3F}} | ||
===4F=== | ===4F=== | ||
{{AreaLandSpawns|Location= | {{AreaLandSpawns|Location=Pokemon Tower 4F}} | ||
===5F=== | ===5F=== | ||
{{AreaLandSpawns|Location= | {{AreaLandSpawns|Location=Pokemon Tower 5F}} | ||
===6F=== | ===6F=== | ||
{{AreaLandSpawns|Location= | {{AreaLandSpawns|Location=Pokemon Tower 6F}} | ||
===7F=== | ===7F=== | ||
{{AreaLandSpawns|Location= | {{AreaLandSpawns|Location=Pokemon Tower 7F}} | ||
===Basement floors=== | ===Basement floors (B1—B29)=== | ||
{{AreaLandSpawns|Location= | {{AreaLandSpawns|Location=Pokemon Tower B1}} | ||
===Pokémon Tower Underground ([[Membership|members-only]])=== | ===Pokémon Tower Underground ([[Membership|members-only]])=== | ||
{{AreaLandSpawns|Location= | {{AreaLandSpawns|Location=Pokemon Tower Underground}} | ||
==Items== | ==Items== | ||
{{AreaItems|Type=Ghost|Contents= | {{AreaItems|Type=Ghost|Contents= | ||
{{AIR|Item=Antidote|Cooldown=6 days|Location=On 2F beyond a ghostly lady who was on her vigil to guard the item for you}} | {{AIR|Item=Antidote|Cooldown=6 days|Location=On 2F beyond a ghostly lady who was on her vigil to guard the item for you}} | ||
{{AIR|Item=Dusk Stone|Cooldown= | {{AIR|Item=Dusk Stone|Cooldown=Not respawnable|Location=Hidden Item. On the gravestone directly west of the stairs going down in B25}} | ||
}} | }} | ||
==NPC Trainers== | ==NPC Trainers== | ||
=== | ===Pokémon Tower 2F=== | ||
{{NPCTable|Location={{PAGENAME}} 2F|Type=Ghost|Contents= | {{NPCTable|Location={{PAGENAME}} 2F|Type=Ghost|Contents= | ||
{{NPCTrainer|Class=Ghost|Gender= | {{NPCTrainer|Class=Ghost|Gender=man|Lineup= | ||
{{NPCLineup|Pokemon=Kadabra | {{NPCLineup|Pokemon=Abra,Kadabra|Levels=32,34}} | ||
}} | }} | ||
{{NPCTrainer|Class=Ghost|Gender=woman|Lineup= | {{NPCTrainer|Class=Ghost|Gender=woman|Lineup= | ||
{{NPCLineup|Pokemon=Ekans,Arbok|Levels= | {{NPCLineup|Pokemon=Ekans,Arbok|Levels=32,35}} | ||
}} | }} | ||
}} | }} | ||
=== | ===Pokémon Tower 3F=== | ||
{{NPCTable|Location={{PAGENAME}} 3F|Type=Ghost|Contents= | {{NPCTable|Location={{PAGENAME}} 3F|Type=Ghost|Contents= | ||
{{NPCTrainer|Class=Ghost|Gender= | {{NPCTrainer|Class=Ghost|Gender=man|Lineup= | ||
{{NPCLineup|Pokemon=Muk|Levels= | {{NPCLineup|Pokemon=Muk|Levels=35}} | ||
}} | }} | ||
{{NPCTrainer|Class=Ghost|Gender=woman|Lineup= | {{NPCTrainer|Class=Ghost|Gender=woman|Lineup= | ||
{{NPCLineup|Pokemon= | {{NPCLineup|Pokemon=Gastly,Misdreavus|Levels=35,36}} | ||
}} | }} | ||
{{NPCTrainer|Class=Ghost|Gender=woman|Lineup= | {{NPCTrainer|Class=Ghost|Gender=woman|Lineup= | ||
{{NPCLineup|Pokemon=Gastly,Haunter,Gengar|Levels= | {{NPCLineup|Pokemon=Gastly,Haunter,Gengar|Levels=34,35,35}} | ||
}} | }} | ||
}} | }} | ||
=== | ===Pokémon Tower 4F=== | ||
{{NPCTable|Location={{PAGENAME}} 4F|Type=Ghost|Contents= | {{NPCTable|Location={{PAGENAME}} 4F|Type=Ghost|Contents= | ||
{{NPCTrainer|Class=Ghost|Name=Ariel|Gender=woman|Lineup= | {{NPCTrainer|Class=Ghost|Name=Ariel|Gender=woman|Lineup= | ||
{{NPCLineup|Pokemon=Golbat, | {{NPCLineup|Pokemon=Golbat,Haunter|Levels=34,35}} | ||
}} | }} | ||
}} | }} | ||
=== | ===Pokémon Tower 5F=== | ||
{{NPCTable|Location={{PAGENAME}} 5F|Type=Ghost|Contents= | {{NPCTable|Location={{PAGENAME}} 5F|Type=Ghost|Contents= | ||
{{NPCTrainer|Class=Ghost|Name= | {{NPCTrainer|Class=Ghost|Name=Helluson|Gender=man|Lineup= | ||
{{NPCLineup|Pokemon= | {{NPCLineup|Pokemon=Baltoy,Claydol|Levels=35,36}} | ||
}} | }} | ||
{{NPCTrainer|Class=Ghost|Name=Heave|Gender=woman|Lineup= | {{NPCTrainer|Class=Ghost|Name=Heave|Gender=woman|Lineup= | ||
{{NPCLineup|Pokemon=Haunter, | {{NPCLineup|Pokemon=Haunter,Misdreavus|Levels=35,35}} | ||
}} | }} | ||
}} | }} | ||
=== | ===Pokémon Tower 6F=== | ||
{{NPCTable|Location={{PAGENAME}} 6F|Type=Ghost|Contents= | {{NPCTable|Location={{PAGENAME}} 6F|Type=Ghost|Contents= | ||
{{NPCTrainer|Class=Ghost|Name=Padmay|Gender=woman|Lineup= | {{NPCTrainer|Class=Ghost|Name=Padmay|Gender=woman|Lineup= | ||
{{NPCLineup|Pokemon= | {{NPCLineup|Pokemon=Golett,Hypno|Levels=35,37}} | ||
}} | }} | ||
{{NPCTrainer|Class=Ghost|Name=Ty|Gender= | {{NPCTrainer|Class=Ghost|Name=Ty|Gender=man|Lineup= | ||
{{NPCLineup|Pokemon= | {{NPCLineup|Pokemon=Alakazam|Levels=38}} | ||
}} | }} | ||
}} | }} | ||
=== | ===Pokémon Tower 7F=== | ||
{{NPCTable|Location={{PAGENAME}} 7F|Type=Ghost|Contents= | {{NPCTable|Location={{PAGENAME}} 7F|Type=Ghost|Contents= | ||
{{NPCTrainer|Class=Rocket Grunt|Gender=boy|Lineup= | {{NPCTrainer|Class=Rocket Grunt|Gender=boy|Lineup= | ||
{{NPCLineup|Pokemon= | {{NPCLineup|Pokemon=Raticate,Ariados|Levels=38,39}} | ||
}} | }} | ||
{{NPCTrainer|Class=Rocket Grunt|Gender=boy|Lineup= | {{NPCTrainer|Class=Rocket Grunt|Gender=boy|Lineup= | ||
{{NPCLineup|Pokemon= | {{NPCLineup|Pokemon=Patrat,Watchog|Levels=38,40}} | ||
}} | }} | ||
{{NPCTrainer|Class=Rocket Grunt|Gender=boy|Lineup= | {{NPCTrainer|Class=Rocket Grunt|Gender=boy|Lineup= | ||
{{NPCLineup|Pokemon=Fearow,Raticate, | {{NPCLineup|Pokemon=Fearow,Raticate,Golbat|Levels=38,40,42}} | ||
}} | }} | ||
}} | }} | ||
==Bosses== | |||
{{Main|Urahara (boss)}} | |||
[[Urahara (boss)]], based on one of the former Artists of the PRO staff team, can be found in '''3F'''. | |||
Latest revision as of 19:35, 6 February 2023
| Pokémon Tower - Kanto | |||||||||||||||||||||||||||||||
|
|||||||||||||||||||||||||||||||
Location  A positional vantage point of Pokémon Tower in Kanto. | |||||||||||||||||||||||||||||||
|
|||||||||||||||||||||||||||||||


Pokémon Tower is a mausoleum tower in Lavender Town in Kanto.
It is a numerously multistory building, housing dozens of floors: 7 upper-level floors, 29 basement floors, and a membership-exclusive bottommost floor.
This tower serves as an essential lead-up for a trainer's Gym-successional storyline, as it is the central premise of the Pokéflute quest wherein the eponymous item is obtained to rouse the otherwise-soporific Snorlax on Route 12.
It is putatively the most viable area to hunt for Ghost-type Pokémon. Many of the Ghost-type inhabitants are believed to be the ghostly manifestations of deceased Pokémon, including a ghostly Marowak mother on the sixth floor that must be defeated in order to be properly exorcised.
Notable miscellanies
Pain Split-tutor
A move-tutor for the Pain Split technique can be found stationed on the sixth floor. She will impart the technique to any compatible Pokémon for a price of ![]() 4,500 per tutee.
4,500 per tutee.
Hypnosis-tutor
A move-tutor for the Hypnosis technique can also be found in Pokémon Tower B12. She will teach Hypnosis to any compatible pokemon for a price of ![]() 12,000 per tutee.
12,000 per tutee.
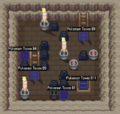
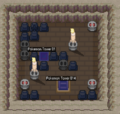
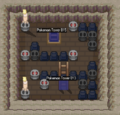
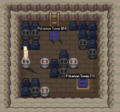
Basement floor
Subjoined to the tower is a complex of basement floors; there are 30 of them total: a sinuous concatenation of 29 basement floors and the bottommost Pokémon Tower Underground map, which can be accessed exclusively by members for a trove of rarer Ghost-type Pokémon.
Because of the intricacy of the maze, it is easy to become misdirected when navigating your way to the bottommost basement floor; as such, it is advised to overview the collage below as a navigational aid, which annotates all the floors that all ladders and telepads are interlinked to.
-
 B1
B1 -
 B2
B2 -
 B3
B3 -
 B4
B4 -
 B5
B5 -
 B6
B6 -
B6
-
 B7
B7 -
 B8
B8 -
 B9
B9 -
 B10
B10 -
 B11
B11 -
 B12
B12 -
 B13
B13 -
 B14
B14 -
 B15
B15 -
 B16
B16 -
 B17
B17 -
 B18
B18 -
 B19
B19 -
 B20
B20 -
 B21
B21 -
 B22
B22 -
 B23
B23 -
 B24
B24 -
 B25
B25 -
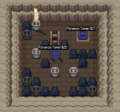 B26
B26 -
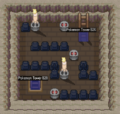 B27
B27 -
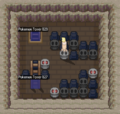 B28
B28 -
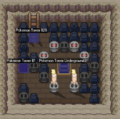 B29
B29


Wild Pokémon
2F
| Pokémon | Level range | Times | Held Item | Rarity Tier | |||
|---|---|---|---|---|---|---|---|
| Cubone | 30-30 | Morning | Day | Night | Uncommon | ||
| Gastly | 19-19 | Morning | Day | Night | Common | ||
| Haunter | 19-19 | Morning | Day | Night | Common | ||
| Rattata | 30-30 | Morning | Day | Night | Common | ||
| Zubat | 30-30 | Morning | Day | Night | Common | ||
| |||||||
3F
| Pokémon | Level range | Times | Held Item | Rarity Tier | |||
|---|---|---|---|---|---|---|---|
| Cubone | 30-30 | Morning | Day | Night | Uncommon | ||
| Gastly | 19-19 | Morning | Day | Night | Common | ||
| Haunter | 19-19 | Morning | Day | Night | Common | ||
| Rattata | 30-30 | Morning | Day | Night | Common | ||
| Zubat | 30-30 | Morning | Day | Night | Common | ||
| |||||||
4F
| Pokémon | Level range | Times | Held Item | Rarity Tier | |||
|---|---|---|---|---|---|---|---|
| Cubone | 30-32 | Morning | Day | Night | Uncommon | ||
| Gastly | 19-19 | Morning | Day | Night | Common | ||
| Haunter | 19-19 | Morning | Day | Night | Common | ||
| Misdreavus | 30-32 | Morning | Day | Night | Uncommon | ||
| Raticate | 30-32 | Morning | Day | Night | Common | ||
| Zubat | 30-32 | Morning | Day | Night | Common | ||
| |||||||
5F
| Pokémon | Level range | Times | Held Item | Rarity Tier | |||
|---|---|---|---|---|---|---|---|
| Cubone | 30-32 | Morning | Day | Night | Uncommon | ||
| Duskull | 30-32 | Morning | Day | Night | Uncommon | ||
| Gastly | 19-19 | Morning | Day | Night | Common | ||
| Golbat | 30-32 | Morning | Day | Night | Common | ||
| Golett | 30-32 | Morning | Day | Night | Rare | ||
| Haunter | 19-19 | Morning | Day | Night | Common | ||
| Raticate | 30-32 | Morning | Day | Night | Common | ||
| |||||||
6F
| Pokémon | Level range | Times | Held Item | Rarity Tier | |||
|---|---|---|---|---|---|---|---|
| Cubone | 30-32 | Morning | Day | Night | Uncommon | ||
| Gastly | 19-19 | Morning | Day | Night | Common | ||
| Golbat | 30-32 | Morning | Day | Night | Common | ||
| Haunter | 19-19 | Morning | Day | Night | Common | ||
| Nincada | 30-32 | Morning | Day | Night | Rare | ||
| Raticate | 30-32 | Morning | Day | Night | Common | ||
| Shuppet | 25-25 | Morning | Day | Night | Uncommon | ||
| |||||||
7F
| Pokémon | Level range | Times | Held Item | Rarity Tier | |||
|---|---|---|---|---|---|---|---|
| Cubone | 30-32 | Morning | Day | Night | Uncommon | ||
| Gastly | 19-19 | Morning | Day | Night | Common | ||
| Gengar | 19-19 | Morning | Day | Night | Common | ||
| Golbat | 30-32 | Morning | Day | Night | Common | ||
| Haunter | 19-19 | Morning | Day | Night | Common | ||
| Honedge | 15-19 | Morning | Day | Night | Rare | ||
| Marowak | 30-32 | Morning | Day | Night | Uncommon | ||
| |||||||
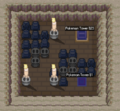
Basement floors (B1—B29)
| Pokémon | Level range | Times | Held Item | Rarity Tier | |||
|---|---|---|---|---|---|---|---|
| Gastly | 23-23 | Morning | Day | Night | Uncommon | ||
| Rattata | 10-14 | Morning | Day | Night | Common | ||
| Zubat | 10-14 | Morning | Day | Night | Common | ||
| |||||||
Pokémon Tower Underground (members-only)
| Pokémon | Level range | Times | Held Item | Rarity Tier | |||
|---|---|---|---|---|---|---|---|
| Duskull | 24-25 | Morning | Day | Night | Uncommon | ||
| Gengar | 19-19 | Morning | Day | Night | Common | ||
| Golbat | 24-25 | Morning | Day | Night | Common | ||
| Haunter | 19-19 | Morning | Day | Night | Common | ||
| Litwick | 26-27 | Morning | Day | Night | Rare | ||
| Misdreavus | 24-25 | Morning | Day | Night | Uncommon | ||
| Raticate | 24-25 | Morning | Day | Night | Common | ||
| Spiritomb | 24-25 | Morning | Day | Night | Rare | ||
| |||||||
Items
| Item | Quantity | Cooldown | Location | |
|---|---|---|---|---|
| Antidote | 1 | 6 days | On 2F beyond a ghostly lady who was on her vigil to guard the item for you | |
| Dusk Stone | 1 | Not respawnable | Hidden Item. On the gravestone directly west of the stairs going down in B25 | |
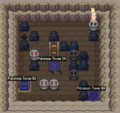
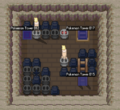
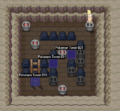
NPC Trainers
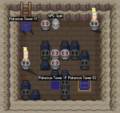
Pokémon Tower 2F
Pokémon Tower 2F Trainers | ||||||||||||||||||||||||||||||||||||
|
||||||||||||||||||||||||||||||||||||
|
||||||||||||||||||||||||||||||||||||
All NPCs cool down after 7 days unless noted contrariwise. | ||||||||||||||||||||||||||||||||||||
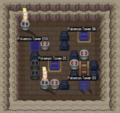
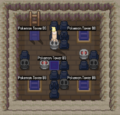
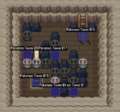
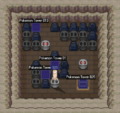
Pokémon Tower 3F
Pokémon Tower 3F Trainers | ||||||||||||||||||||||||||||||||||||
|
||||||||||||||||||||||||||||||||||||
|
||||||||||||||||||||||||||||||||||||
|
||||||||||||||||||||||||||||||||||||
All NPCs cool down after 7 days unless noted contrariwise. | ||||||||||||||||||||||||||||||||||||
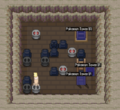
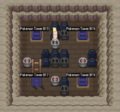
Pokémon Tower 4F
Pokémon Tower 4F Trainers | ||||||||||||||||||||||||||||||||||||
|
||||||||||||||||||||||||||||||||||||
All NPCs cool down after 7 days unless noted contrariwise. | ||||||||||||||||||||||||||||||||||||
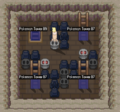
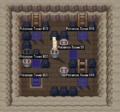
Pokémon Tower 5F
Pokémon Tower 5F Trainers | ||||||||||||||||||||||||||||||||||||
|
||||||||||||||||||||||||||||||||||||
|
||||||||||||||||||||||||||||||||||||
All NPCs cool down after 7 days unless noted contrariwise. | ||||||||||||||||||||||||||||||||||||
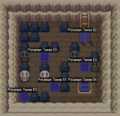
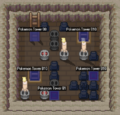
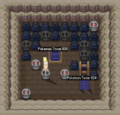
Pokémon Tower 6F
Pokémon Tower 6F Trainers | ||||||||||||||||||||||||||||||||||||
|
||||||||||||||||||||||||||||||||||||
|
||||||||||||||||||||||||||||||||||||
All NPCs cool down after 7 days unless noted contrariwise. | ||||||||||||||||||||||||||||||||||||
Pokémon Tower 7F
Pokémon Tower 7F Trainers | ||||||||||||||||||||||||||||||||||||
|
||||||||||||||||||||||||||||||||||||
|
||||||||||||||||||||||||||||||||||||
|
||||||||||||||||||||||||||||||||||||
All NPCs cool down after 7 days unless noted contrariwise. | ||||||||||||||||||||||||||||||||||||
Bosses
- Main article: Urahara (boss)
Urahara (boss), based on one of the former Artists of the PRO staff team, can be found in 3F.